|
|
Applying Leverage to Mandolin Barre Chords Posted by Bradley Laird
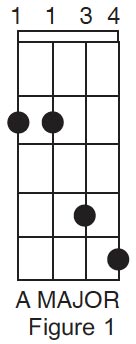
Playing "barre chords" can be extremely useful on the mandolin in playing swing music, Dawg music, jazz standards and even bluegrass. Some chords like the maj7 and min7 rely heavily on the technique. I even use barre chords chopping away in bluegrass... sometimes. Especially when I want the root (the I) to be the lowest note of the chord. Figure 1 shows a typical mandolin barre chord -- an A major chord.
The first finger plays both 2nd fret notes by laying flat across the strings and the 3rd and 4th finger play the other two notes. (For more barre chord shapes you might want to scope out my video I created about barre chords here. Or all of my free mandolin lessons here and my mandolin books here.) A lot of players seem to have trouble with these chords. A common complaint is that they seem to require a huge amount of finger strength to play cleanly and clearly, especially for long periods of time. If your action is really, really low and you have pretty strong hands they aren't as hard to play but bluegrassers like to have their action a bit higher and that makes these chords more difficult to execute. I think there is an easier way, a more mechanically efficient way, to play these barre chords. Follow along here and study the photos and try my method and see what you think.
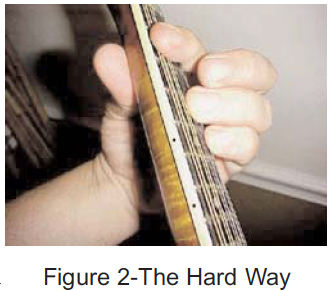
Figure 2 is a photograph of the "normal" way most people attack barre chords on the mandolin. It is the sort of "Mel Bay hand photo" approach. (You've all seen those photos in chord books and it looks so perfect and so contorted at the same time.) My hand in figure 2 looks pretty relaxed but I can tell you that I am squeezing the life out of that neck with my thumb! My mandolin has a "v" shaped neck and the "v" is about to smash my thumb bone in the photo. Playing a barre chord in this so-called correct way makes the thumb and finger muscles work like mad. I don't like to work like mad and I don't like my hand to cramp up so I fiddled around a long time ago and came up with a way that makes this physically much easier. Take a look now at Figure 3.
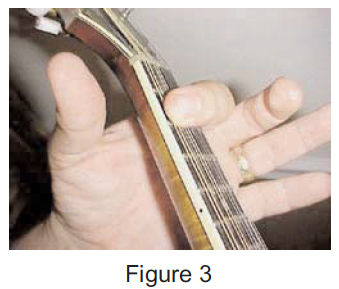
In this photo you can see that I have placed by index finger in the correct place for playing the 4th and 3rd strings. My thumb is not touching the neck at all so it is doing no work at the moment. The pressure (pretty light at the moment) exerted down on the strings is coming mostly from the weight of my entire left arm. It is like I am hanging my arm from the fingerboard. Next, take a look at Figure 4.
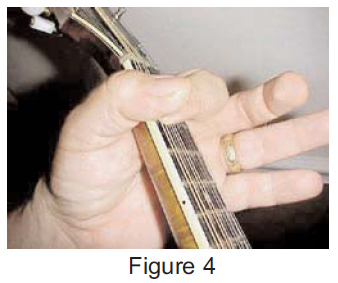
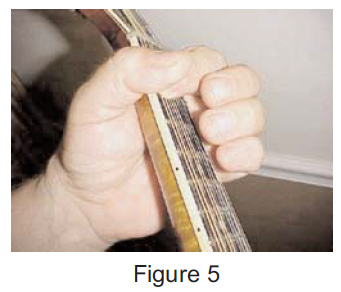
I have now rolled by thumb up and have just barely hooked it over the top of my index fingertip forming a "ring." I am not really squeezing up with the base of the thumb at all. I have just formed the "ring" and am letting it hang from the neck by the weight of my arm. Important! The thumb is not mashing down on the index finger. It is only touching. Completing the circle as it were. The downward pressure on strings 3 and 4 is created by the weight of the arm and is transferred through the index finger. In Figure 5, I have now brought my 3rd and 4th fingers down almost in contact with the strings.
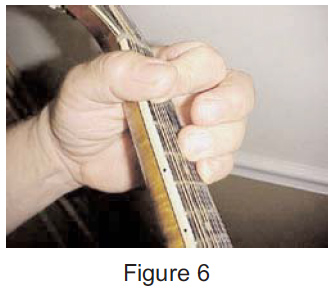
Next, instead of squeezing down onto the strings I do something different. Look at Figure 6.
In the final photograph I have turned my wrist slightly outward. I have, in fact, moved my elbow slightly away from my body. This turning of the hand makes use of the entire arm to bring the fingers down into contact with the strings. The index finger/thumb "ring" is the fulcrum of a long lever that goes all the way back to the shoulder muscles! The shoulder muscle is much stronger than the muscle at the base of the thumb I can assure you! The finger muscles are doing some work but it is mostly just an effort to keep the fingers in place. The real power comes from the leverage applied by the entire arm. If you imagine that you are trying to break the neck off, bending it upwards, trying to snap it off at the 5th fret, you will be imagining the force directions correctly. Don't actually do it though. (Like I needed to say that. haha) But, if you really WERE to snap it off in this way, you would use your whole arm because it is much stronger and you'd never do it with finger pressure alone. In that final photo it may look like I have grabbed the neck in a fist and it gives the impression that I am using a lot of force but it is considerably easier than the way shown in Figure 2! Let me state a few key points of this idea: 1. The thumb is helping keep the index finger solidly down on the 4th and 3rd strings. 2. The power which is fretting the 3rd and 4th strings is coming from the weight of the arm. 3. The downward force exerted by the 3rd and 4th fingers is compounded by a very long lever originating at the shoulder. If the 3rd and 4th fingers are held in place rigidly (not allowed to move) and they are then "cranked down" onto the strings by using the arm as a lever you can almost crack walnuts under the fingertips! One final tip: Remember that the 1st finger does not need to apply any pressure to the 1st and 2nd strings. Don't waste energy trying to form a barre all the way across all four strings. You can and will touch those strings with your index finger but they don't have to be held down since they 3rd and 4th fingers are fretting them at a higher fret. The same idea applies to barre chords on a guitar. A lot of guitar players waste a lot of energy pressing all six strings down with their index finger when they could allow the center to relax and rise up a bit.
(Originally written for my October, 2005 MandoUniversity Newsletter. My newsletter archive is here.)
Follow Me
|


Copyright 2014, Bradley Laird
![]()