|
First Lesson for the New Mandolin Player
BY BRADLEY LAIRD Note: I also have a similar article tailored for new banjo owners here. Congratulations on your new mandolin! I am sure you are eager to get started playing and this lesson will give you some basic information to get you up and running quickly. By the end of this article you will be assembled, tuned and be playing your mandolin! First, let's talk about the instrument: When You First Get a New Mandolin Most mandolins when they are shipped will have the strings attached but they will be rather slack. The bridge is normally in a little bag inside the box or case somewhere and you'll need to slip it under the strings, get it close to the correct position, and tune up the strings. Also, in the case somewhere you will usually find a small tapered wooden or plastic "peg" called the end pin. You'll need to install that too. You may also find a small "Allen" wrench and possibly a warranty card and other paperwork. You can set those aside for now. The wrench is used to adjust the interal "truss rod" which should be left to someone with experience. Just keep the wrench in the case for the future. Next I'll go through the steps to get your new mandolin ready to play: The Strings As I said usually new mandolins will arrive with the strings already in place but they are not tight. This is to reduce the chance of damage during shipments. If your mandolin has NO STRINGS on it at all go watch my video about how to install strings and then come back to continue.
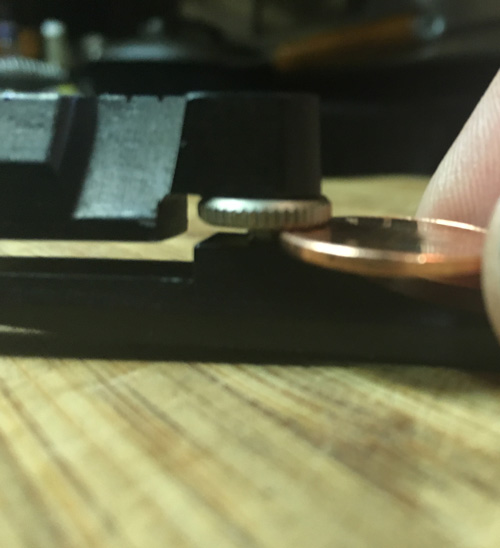
Probably your strings are already in place so the next step will be to install the "bridge." The Bridge The bridge is a wooden contraption which is normally made so that the upper part is adjustable up and down my means of screws and little metal thumbwheels. If the two parts have come apart just slip the top part onto the screw posts and adjust both of the thumbwheels so that you can just slip a penny under the thumbwheel. That is a good starting location. That gives you a little room to go down if you need to.
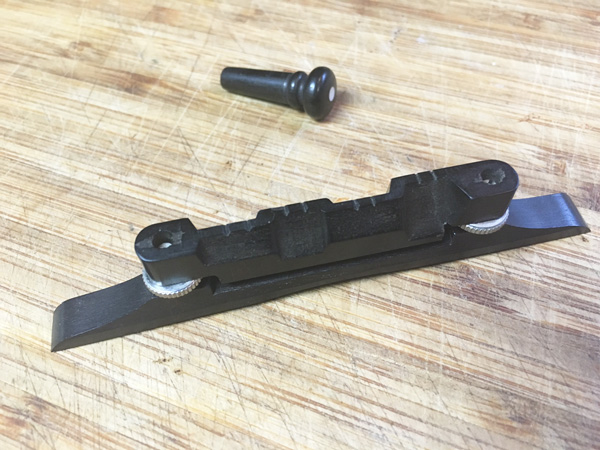
Here is a picture of the bridge and the end pin. In this photo the bridge is assembled.
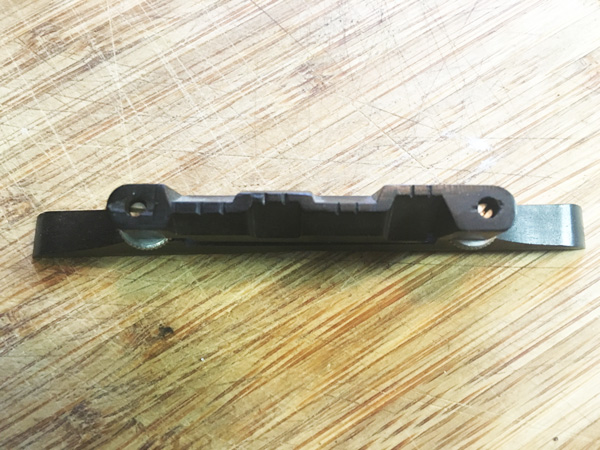
You will notice that the top section of the bridge has various cuts and angles which alter the overall length of each pair of strings. You will also see the small string notches in pairs. The bridge is made this way to help make the thicker strings and the thinner strings play in tune with a common bridge placement. So, which way does it go? Here is a picture of the top of the bridge:
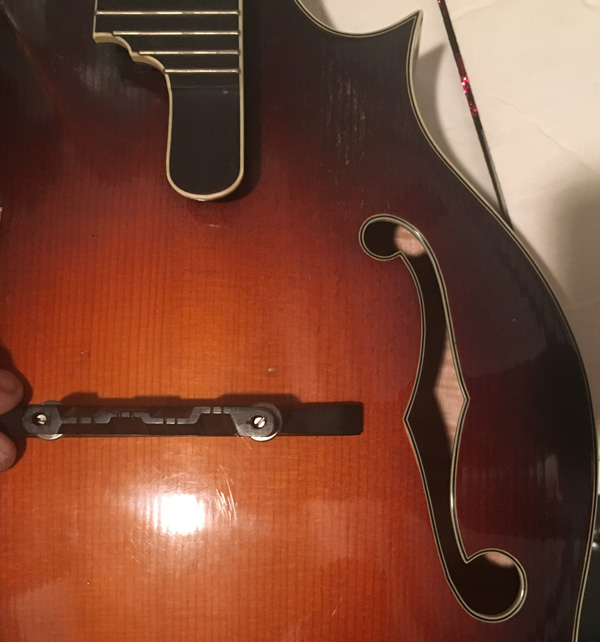
You'll notice that on one end the string resting position lines up with the end of the bridge. That end is for the thinner strings. The other end has the strings resting more in the center of the end of the bridge. That end goes under the thicker bass strings. So, in this picture, the side facing the top of the photo faces the peg head and the bottom of the picture faces the tail piece. Sometimes you can simply tell based on the width of the little string slots. In this photo you can see that the thinner slots are on the right and the thicker ones are on the left. If you happen to put your bridge on backwards, and some bridge designs are hard to tell, don't worry. It's moveable and can be flipped around later. The mandolin will "play" with the bridge either way. It will just play in tune better if it is correctly positioned. If you just can't tell which way to go just flip a coin, stick it on, and continue. You will not be the first person to ever have one on backwards and it's not the end of the world. Starting Position for The Bridge The correct location of the bridge is very important for your mandolin to play in tune up and down the neck. If your mandolin has "f holes" you can use the centers of the "f holes" as a guide in positioning the bridge. Loosen the strings just enough to easily slip the bridge assembly under the strings and align the bridge with a straight line from one "center of the f hole" and the other. Here is a picture to make this clear. I have the strings removed in this photo so you can really see the slots in the top of the bridge. Notice the thin ones are on the right and the thicker slots on the left.
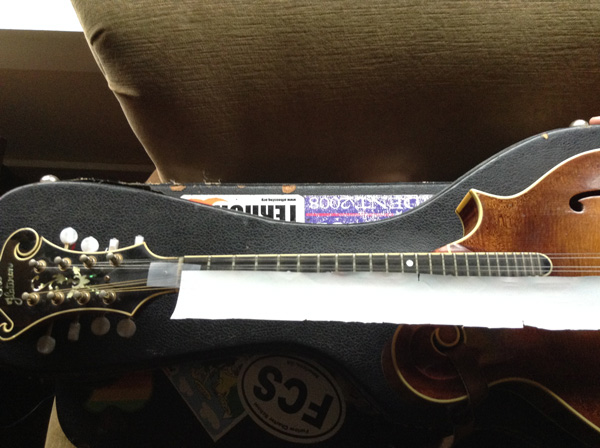
If you have an "oval hole" mandolin here is what you do... (You can do this with f hole mandolins too if you prefer!) 1. Lay the mandolin on its back. Get a long strip of paper or light cardboard. The strip needs to be long enough to stretch from the "nut" all the way to the bridge. Too long is better than too short. I used a long piece of gift wrapping paper for these photos and you can do the same thing I bet! 2. Place one end of the strip so that it rests against the front edge of the "nut" where the strings rest near the tuning peg end of the instrument. You might even stick it on with a piece of scotch tape. Here is my strip of paper taped to the nut:
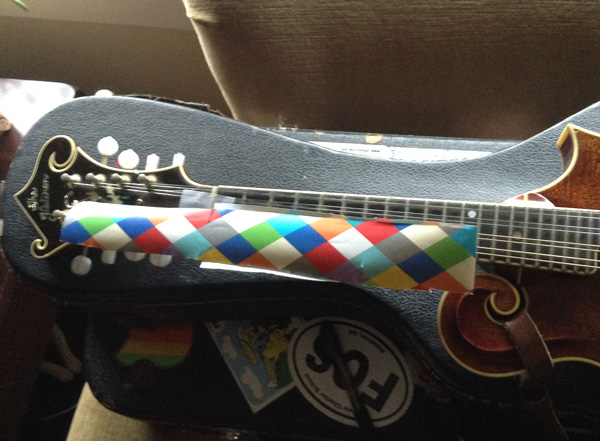
3. Locate the 12th fret. Just count up from the peghead end and find the 12th fret. Usually there are 2 pearl dots at that location. When you find the 12th fret make a pencil mark on the paper strip so you have a reference showing the exact length from the nut to the 12th fret. I have already marked the 12th fret in the picture above. 4. Fold the strip at that 12th fret mark and make a new mark where the strip is attached at the nut. This new mark will be exactly double the nut to 12th fret length. You can cut the strip off at this new mark so that your strip is exactly nut to 12th fret X 2 in length. Here is what that looks like:
5. Unfold the paper to full length. Keep the "nut end" still taped so that the end is butted up against the front edge of the nut. The center fold should line up directly over the 12th fret.
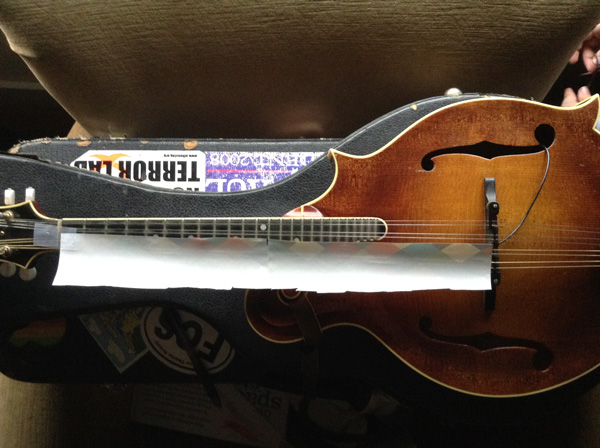
6. Slip the assembled bridge under the strings so that the string resting point of the thinnest strings are aligned with the end of the paper strip. That is close enough as a starting point. Due to the "compensated" (differently placed string resting points) of the top of the bridge, you will notice that all of the other strings are slighly longer than the end of the paper strip. That is correct. 7. Align the bridge straight across so that its top is at right angles to the length of the strings and centered between the f holes. You can also judge the centering by looking at how the strings line up with the sides of the fret board. As you tighten the strings during tuning it will "self-center" a bit but you should keep an eye on it and adjust it side to side BEFORE you get too much tension on the strings. If you run the strings all the way up to "in tune" it will be nearly impossible to move the bridge due to the down pressure of the strings. DO NOT ever attempt to move the bridge under full tension. You will scar up the top of the mandolin with ugly scratches. Always loosen the strings, at least partially, before any future movements or if you decide to raise or lower the thumb wheels. 8. Begin turning the tuning pegs to apply some tension to the strings. Just tighten them enough to hold the bridge in place. You may notice that they are starting to make musical sounds! Double check that the bridge is straight across, not leaning or tipping, and that the thinnest strings are lined up with the end of the paper strip. You can now remove the paper measuring strip. Initial Setting of String Height You will probably tweak this setting later but for now you just want to be sure that the strings are high enough above the fretboard so they don't rattle and buzz. You also don't want the strings too high or they will be really hard to press down. Here is a good place to start... 1. With your bridge in place and the strings in their slots. You want to have just enough tension on the strings to keep the bridge in place. Don't tune them up super tight yet. 2. Now use the thumbwheels to raise or lower the upper part of the bridge so that the strings are about 1/8" above the top of the 12th fret. You can use two dimes stacked up as a thickness reference. IMPORTANT - This is just a starting place! The purpose of these instructions is just to get you "close" and allow you to tune up and start playing. Probably, pretty soon, you will want to do a little more adjusting to get the "action" just right and to make it more comfortable to play. Later, for the best tone, you'll want to custom fit the bottom of the bridge (the feet) to perfectly match the top of your mandolin. That is described in The Mandolin Handbook which is the owner's manual for the mandolin which they didn't give you! (Maybe some manufacturers do include some set up information, and bless them if they do, but most of the time there is little or NO good instructions in the box with your new instrument. I encourage you to take a look at my eBook called The Mandolin Handbook which contains 80 pages of information for beginning mandolin players. It covers all aspects of set-up and a lot of other information you can use. It is money well spent when you are ready to learn more about you mandolin! Here is a link so you can read all about it. http://www.bradleylaird.com/mandou%2Dsite/buymh.html Install The End Pin The end pin is just a friction fit. Insert it into the hole near the tailpiece and give it a twist with your fingers as you press it in. DO NOT pound the end pin into place or you will split the tail block! Also, do not glue it in place. If the end pin doesn't feel snug and tight by hand pressing and twisting you should consult my Mandolin Handbook before you trust using it for a strap attachment point. Usually, with a little twist and some firm pressing with your fingers it will snug right up and be pretty tight. The only purpose for the end pin is to attach a strap. Watch this video which talks about this and a few other topics for beginners:
You Are Ready To Tune Up Make sure that each pair of strings are resting in their correct slots at the bridge and at the nut. Now, watch my video about tuning: http://www.bradleylaird.com/playthemandolin/videos-02.html Now, Learn Some Easy Chords Here is a free video lesson which will teach you some simple chords: http://www.bradleylaird.com/playthemandolin/videos-03.html And here is another free video lesson which has very easy mandolin chords: http://www.bradleylaird.com/playthemandolin/videos-greensleeves-chords-free.html The Next Step When you are ready take a look at my beginner video lessons here: http://www.bradleylaird.com/playthemandolin/video-lesson-beginner-series-pdl.html It's a complete step-by-step course in playing your mandolin. You'll learn chords and rhythm from the ground up and you'll learn to play melodies and instrumentals. Thousands of people have used these lessons to get off to a good start with their playing. (Note: It is NOT a subscription site. I don't believe in forcing people to make long term commitments. With me it's either free or pay as you go.) Have fun and happy picking! Bradley Laird
|
|
|


Copyright 2021, Bradley Laird
![]()