|
Banjo Unboxing and Initial Setup
BY BRADLEY LAIRD Note: I also have a similar article tailored for new mandolin owners here. Congratulations on your new 5-string banjo! I am sure you are eager to get started playing and this lesson will give you some basic information to get you up and running quickly. By the end of this article you will be assembled, tuned and be playing your banjo! First, let's talk about the instrument: When You First Get a New Banjo Most banjos when they are shipped will have the strings attached but they will be rather slack. The bridge is normally in a little bag inside the box or case somewhere and you'll need to slip it under the strings, get it close to the correct position, and tune up the strings. There may be a little bag with some tools in it. One of the tools is used to tighten the head and one tool is used to adjust the internal "truss rod" which should be left to someone with experience. Hang on to those tools. You will not need them for the initial setup but they will come in handy later. Next, I'll go through the steps to get your new banjo ready to play: The Strings As I said usually new banjos will arrive with the strings already in place but they are not tight. This is to reduce the chance of damage during shipments. If your banjo has NO STRINGS on it at all go watch my video about how to install strings and then come back to continue. If your strings are already attached just skip down to "The Bridge". The process is not rocket science and simply involves putting the loop end of the string onto a hook on the tailpiece and then winding the string around the correct tuning peg.
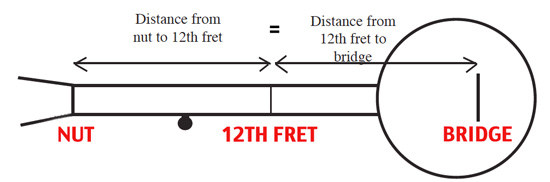
Probably your strings are already in place so the next step will be to install the "bridge." The Bridge The bridge is a wooden contraption which stands upright on the banjo head and holds the strings at the correct height and spaces them apart. Lay the bridge flat on the head and slide it under the strings. Then stand the bridge up so that it rests on its three feet. Along the top side (often made of black ebony wood) you'll notice 5 tiny slots. Arrange the strings so that no strings cross and each string rests in its slot. If your strings are too tight to stand the bridge upright you'll need to slacken them just a bit by turning the various tuning buttons. Don't go wild and loosen the strings so much that they jump off at the tailpiece hooks or you will have a haywire mess on your hands to sort out. Just loosen them only enough to stand the bridge up. Once the 5 strings are nestled in their slots you should confirm that they are also in their proper slots at the "nut". Actually the 5th string has its own nut so you really have two nuts. Be sure all 5 strings are properly sitting in their slots at the nut and the bridge and then tighten each string just a enough to be sure the bridge has a little down pressure on it. Starting Position for The Bridge The correct location of the bridge is very important for your banjo to play in tune up and down the neck. Since the bridge is moveable it can be placed in a multitude of positions but ONLY one spot is correct and that single spot is easy to find. Here is how to do it. Note: When I say "nut" in these instructions I mean the nut near the peg head with 4 strings resting in it. The 5th string nut is not used in these measurements. 1. Lay the banjo on its back. If you have a case you can just leave the banjo laying in the case. Get a long strip of paper or light cardboard. The strip needs to be long enough to stretch from the "nut" all the way to the bridge. Too long is better than too short. 2. Place one end of the strip so that it rests against the front edge of the "nut" where the strings rest near the tuning peg end of the instrument. You might even stick it on with a piece of scotch tape. 3. Locate the 12th fret. Just count up from the peg head end and find the 12th fret. Usually there are 2 pearl dots at that location. When you find the 12th fret make a pencil mark on the paper strip so you have a reference showing the exact length from the nut to the 12th fret. 4. Fold the strip at that 12th fret mark and make a new mark where the strip is attached at the nut. This new mark will be exactly double the nut to 12th fret length. You can cut the strip off at this new mark so that your strip is exactly nut to 12th fret X 2 in length. 5. Unfold the paper strip to full length. Keep the "nut end" still taped so that the end is butted up against the front edge of the nut. The center fold should line up directly over the 12th fret. 6. Move the bridge under the strings so that the top edge is aligned with the end of the strip. That is close enough as a starting point. 7. Align the bridge straight across so that its top is at right angles to the length of the strings. You can also judge the centering by looking at how the strings line up with the sides of the fret board. As you tighten the strings during tuning you should keep an eye on it and adjust it side to side BEFORE you get too much tension on the strings. If you run the strings all the way up to "in tune" it will be nearly impossible to move the bridge due to the down pressure of the strings. DO NOT ever attempt to move the bridge under full tension or you may break the feet. Always loosen the strings partially before any future movements. 8. Begin turning the tuning pegs to apply some tension to the strings. Just tighten them enough to hold the bridge in place. You may notice that they are starting to make musical sounds! ALTERNATE METHOD - If you have a tape measure or yard stick you can skip all those instructions and do this instead. Measure from the front edge of the nut to the center of the 12th fret. Then measure that same distance from the 12th fret towards the center of the head. That is where you want the bridge. Basic Rule: The bridge will be located twice as far from the nut as the 12th fret.
IMPORTANT - This is just a starting place! The purpose of these instructions is just to get you "close" and allow you to tune up and start playing. Probably, pretty soon, you will want to do a little more adjusting to get the "action" just right and to make it more comfortable to play. Here are some of the things that, pretty soon, you'll want to do to get your banjo sounding and playing at peak performance: 1. Adjust the head tightness for the best sound. 2. Adjust the nut slots which controls the height of the strings (the action) near the nut. 3. Adjust the neck angle which controls the height of the strings over the fret board. 4. Adjust the internal neck "truss rod" which controls a minute amount of fret board curvature needed for a comfortable playing neck. 5. Make minor adjustments to bridge location so the banjo plays perfectly in tune after the other 4 adjustments have been made. There are a few other things which can be done to tweak the set up of your banjo and you SHOULD, over time, learn to do these things yourself. You'll play better and be happier with the sound if you do. My $10 downloadable Banjo Instruction Course eBook + Audio Tracks includes a set-up section in the appendix which explains all of those basic adjustments. I also have a $20 downloadable "play by ear" video course you might want to check out. Here are some links:
Right now you are probably eager to tune your banjo and begin making some racket. You Are Ready To Tune Up Make sure that each string is resting in its correct slot at the bridge and at the nut. And then go to this free lesson which explains tuning: http://www.bradleylaird.com/banjo/lessons/lesson04.html Now, Learn Some Easy Chords Here is another free lesson which will show you some basic chords: http://www.bradleylaird.com/banjo/free-banjo-chords.html Deciding Whether to Play "Scruggs" Style or "Clawhammer Style" These days there are two basic playing styles going on. I have some free basic lessons covering each style. Check 'em both out and learn whichever style floats your boat. Many players learn to do both! Free Scruggs Style (Bluegrass Picking) Banjo Lessons: http://www.bradleylaird.com/banjo/index.html Free Clawhammer Style (Old Timey) Banjo Lessons: http://www.bradleylaird.com/claw/index.html Have fun and happy picking! Bradley Laird
|
|
|


Copyright 2016, Bradley Laird
![]()